Mittwoch, 20. Oktober 2010

Connect to Office - the easiest way to work with documents!

Hi,

today I've teached my students about the "Connect to Office"- Button in the SharePoint 2010. I don't know any student how is not sold on this button - and they are all right! This button is one of the best buttons you can use in SharePoint! OK, before I told you why, i told you how it works.
 You have a document library with several Content Types, two Word Documents and an Excel Sheet.


Fine, and know you push THE button. Choose "Add to SharePoint Sites" under "Connect to Office" in the Ribbon toolbar.

Confirm the dialog box following on your click and open your local Word or Excel and choose "New" like the way you do for creating a Document outside of SharePoint. You would found a new category " templates" with the document library you added before in SharePoint.

Click on it and you see the Content Types from the library in word. Of course, you'll found the Excel Sheet Content Type in your local Excel Client.

To open the Content Type now in Word isn't differently to open it from SharePoint. You can use custom templates as well as the Server Document Properties. And the default Save Location is the SharePoint Library, not your local Filesystem.


As you see- this is the way you can take SharePoint Content Types to your local Word with all the custom templates and Document Properties and all of this stuff. And -yes -, the Content Types works offline- even if the Save Location isn't SharePoint, of course!
But the best argument for this feature is, that this feature makes the handling with documents really more easy. Without a connect to a SharePoint Site, the user has two option:

  1. The user starts his Word Client, create a document, search a location (SharePoint or FileSystem) and load the Document to this location,
  2. or the user search the location in SharePoint and create his document at this position.
With the connect, the user don't have to search a location...

Regards,

Andreas

Mittwoch, 28. Juli 2010

Nintex Workflow 2010: User access control - set permissions for allowed actions

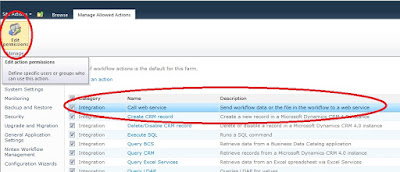
In Nintex Workflow 2010 it is pretty simple to set permission for allowed actions, a good way to personalize the actions a designer can use. OK, to restrict the access to workflow actions, you can uncheck the action in the "Manage allowed actions" menu at Central Administration or Site Collection level, too. Do this, and no one will publish or use a workflow with the unchecked action furthermore. And I mean really no one, uncheck a action is not mapped to specific users or groups. Further, Nintex is clever and detect this unchecked actions in User defined actions (UDA) and a workflow with a UDA containing a unchecked action can't be published. Now, if you want restrict the access for "Call a Webservice" or a "Execute SQL" actions for a specific workflow designer group, but also want all other workflow designers to use UDAs containing such actions preconfigured, you have to manage the permissions in the Central Administration. This settings you only can do in the Central Administration, not on the Site Collection or Site Level. OK, to set permissions, go to the Central Administration and clicking "Managed allowed actions" under the "Nintex Workflow Management" header.


 Select the action you want configure and click on "Edit permissions" at the Ribbon.  Now you have the possibility to uncheck the "Make this actions available for all users" check box and change the users or groups with rights on this action.


In my case, I only allow "sps_admin_ak" to configure the "Call a Webservice" action. The user "sps_admin_ak" configure a UDA ( View this post about UDAs ) with the "Call a Webservice" action, for example to set user permissions on a SharePoint list or web. In the next step, any other workflow designer use this UDA in a workflow.


At least, the workflow designer will be able to publish the workflow with the UDA containing the "Call a webservice". He wont be able to use the "Call a Webservice" directly, but can use it preconfigured in a UDA.

Makes sense, I like it :-)

Donnerstag, 15. Juli 2010

Nintex Workflow 2010: Introduction to User Defined Actions

Hi,

one of the new features in Nintex Workflow 2010 are "User Defined Actions", shortly UDA. Maybe you guess, that a user can define own actions with this new feature - and you are right! A user can build a Workflow in the Workflow designer and save the Workflow as a UDA. Sounds pretty similar to Snippets which is already a feature in Nintex Workflow 2007. The diffrent between Snippets and UDAs is, that UDA is a "black box" with input and output parameters. If a user use a UDA, he can't change the UDA's configuration. OK, now let's have a look how to build a UDA in Nintex Workflow 2010. You can find the UDA Management in the Site Actions menu.

Of course, you can find the UDA Management in the Site Settings, Site Collection Settings and Central Administration, too. In the UDA management, you have several options.

You can create, modify or delete UDAs, import from a Workflow file, export, promote and analyze them. What we want to do is to create a new one. If you click at the Create Button, the Nintex Workflow Designer is opening. The first thing we have to do is to define parameters for the UDA. This are the parameters, a user using our UDA can configure in the Action Configuration. You can find the parameter settings at the "UDA settings" in the Workflow designer Ribbon.

I defined two input parameters for a SiteURL and for a Person or Group. Now I'm ready to build my Workflow. I can use the parameters like variables.

I designed a worklow which is setting user permissions on a SharePoint Site, using the SharePoint WebServices and depending on the input parameters. Finally, I published the Workflow in the usual way. Now, the UDA can be used in other Workflows.

Other Workflow Designers now only have to put this UDA to a Workflow and configure the input parameters to setup User permissions to another site in a Workflow easily.
At my opinion, the UDA feature is one of the  best new features in Nintex Workflow 2010, because it offers the possibility to make the already user friendly Workflow Designer even more friendly for Power Users or Business Users.

Have fun,

Andreas

Dienstag, 13. Juli 2010

Nintex Workflow 2010 released!


Nintex released Nintex Workflow 2010, the follower of Nintex Workflow 2007! Nintex offers with the 2010 product release a new version of their liked workflow engine built in SharePoint 2010. Some of the key features of the new version are:
  • Sharepoint 2010 like Ribbon interface,
  • New SharePoint 2010 features like "Site Workflows",
  • Integration in Infopath, Excel Services and Business Integration services,
  • Integration to Microsoft CRM,
  • User defined actions,
  • Print View,
  • ...
Find more about Nintex Workflow 2010 at the product page.

Regards,

Andreas

Sonntag, 23. Mai 2010

SharePoint Server 2010: Error by creating a Enterprise Search Center

Hi,

do you try to create a enterprise search center? 


 Do you get this not very significant error message back?


Don't panic, this error isn't as bad as it's looks like. After a short look in the SharePoint Logs you find the solution for this. There is this entry in the log file:

"Publishing Feature activation failed. Exception: System.InvalidOperationException: The SharePoint Server Publishing Infrastructure feature must be activated at the site collection level before the Publishing feature can be activated."
The solution: The enterprise search center needs the publishing infrastructure feature on site level. But before the enterprise search center can use an activate this feature, the feature must be allowed by activating on site collection level.


 After you activate the feature on site collection level, you can create a enterprise search center without any problems or error messages.

Regards,

Andreas

Donnerstag, 22. April 2010

CMIS Connector for SharePoint 2010 announced

No more rumors, it's official: Microsoft announced a CMIS connector for SharePoint 2010!!! More details about the announcement can be found here on the Microsoft SharePoint Team Blog.
SharePoint 2010 will contain a CMIS Consumer Webpart to display Contents from other Content Management Interoperabillity Services repositories. Maybe a big step to Composite Content Applications!

If you are more intrested in CMIS, check out this links:


Regards,

Andreas

Montag, 8. Februar 2010

ShareCamp - Born2Share

A new ShareCamp in Germany is born! The german SharePoint- Community starts a ShareCamp under the slogan "Born2Share".
For more information visit sharecamp.de. On this wiki you find information about the event location and time, a member list and a session list!

Let's Share!!!